Tools & Tips
by
Irish — August 9, 2010
- The speed of your stroke determines the darkness of your burned line. The burner tip should just caress the surface of your wood. A smooth, flowing stroke will create a light to medium burn. A slow stroke will create a darker burn.
- Keep the tip of your woodburner as clean as possible. As you work, carbon builds up on the tip, causing even light, smooth burn strokes to become black. Clean your tip often using the manufacturer’s recommended method.
- If you have a variable temperature control woodburner, use as low a setting as possible for each area. You can always darken an area, but it’s a lot harder to lighten it. For burners with only one temperature, use the tool just as it begins to heat up for the very lightest areas of the project. As the tool reaches its final temperature, move onto the darker areas.To go back to the lighter areas, unplug your burner for a few minutes.
- Flow with the direction of the element or object that you are burning. If you are burning a fence rail, your strokes should follow the length of the board creating the grain lines of the wood.
- Transfer only the pattern lines that you really need to establish the design to the wood. Burning over pencil lines sets the pencil into the work, so you may not be able to erase them when the project is complete.
- Work the design from the background to the foreground, when possible. It’s easier to burn in the foreground over a background area.
- Develop each area in layers, working from the lightest tones to the darkest.
- Shadowing creates a three-dimensional feeling in a scene or still-life.
- Use texturing to distinguish one element from another. A dappled or spotted stroke works well for tree leaves, but old barn boards should be done with long line strokes to imply wood grain.
- The number of finely-burned lines that you place in one area can determine how light or dark an area becomes. The more lines that you burn, the darker the area will appear.
- Practice creating as many tonal values, line patterns, and texture patterns as you can on a scrap piece of birch plywood. Use this board as a reference while burning.
- A heavy ceramic floor tile makes a good hot plate for your woodburning tool between strokes.
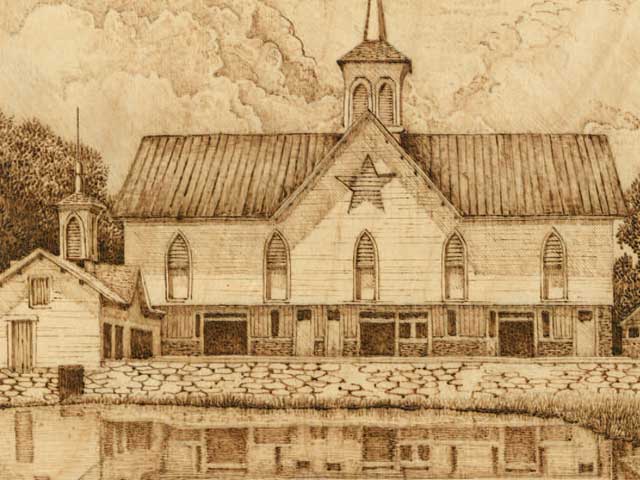
- Shadows become darker as the elements come closer to you. Distant backgrounds, such as mountains behind a barn scene, are paler in tonal value than those found in the barn. A tree in the foreground, in front of the barn, is darker yet.
- Don’t outline everything in the design! Outlining should be used only where you have problems distinguishing one area from another. A beautiful, well-developed burning can be turned into a coloring book image by the over-use of outlines!
 Author: Irish