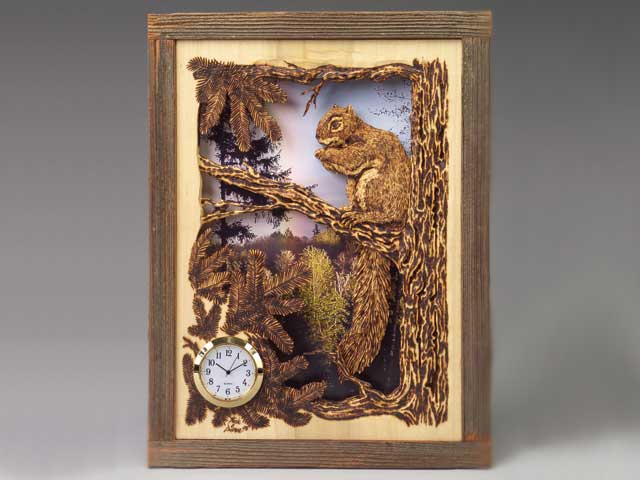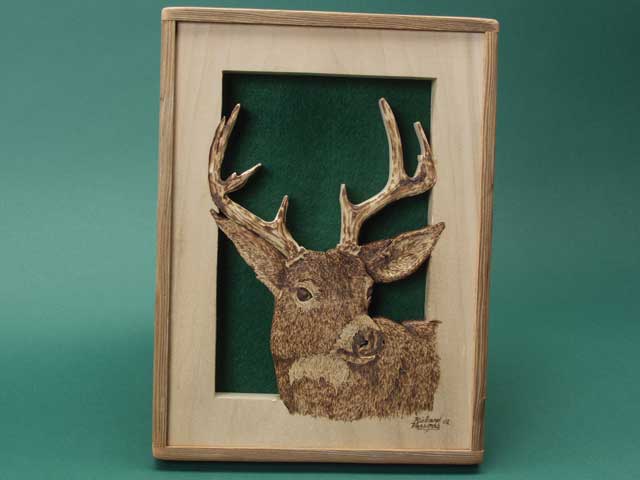
Try your hand at woodburning with this scroll-and wood- burn project. Pyrography, or woodburning, can be as simple or as complex as you wish to make it.
This combination of different techniques results in a wonderful conversation piece that is warm and inviting with a rustic flair.
It is sure to bring a few compliments from friends and family and from those who appreciate handmade works of art.
Step 1: Applying the pattern. Transfer the pattern to the piece of wood you are using for your project. I recommend using graphite paper, which leaves a light pencil-like mark to follow. You may also attach the paper directly to the wood using rubber cement or temporary bond spray adhesive, but this may leave a residue. This residue can interfere with the woodburner’s ability to burn, and it can affect the quality of the adhesion of the lacquer finish.
Step 2: Prepare for cutting. With a drill press or a simple hand drill, make the blade entry holes using a #60 or #62 drill bit for the smaller openings and a 1/8″-diameter bit for the larger openings.
Step 3: Cutting the project. Using a #5 reverse tooth blade, make the interior and exterior cuts. Poplar is durable, easy to work with and has marvelous character-istics of color, grain and hardness for burning and scrolling. Choose a piece of wood that is smooth and free of knots because the resin in knots can affect the burning of your project. In addition, knots are generally harder and can affect the cutting process and weaken the completed project. Remember that starting with good quality raw material has a direct effect on the completed project. Sawing 3/4″ wood goes a little slower than sawing 1/8″ plywood but is easily accomplished. Because of the thickness of the wood, faster saw blade speeds work better, par-ticularly in the long, straight cuts.
Step 4: Preparation for burning. Next round off the sawn edges to simulate the rounded portions of the deer using a standard Dremel with a small sanding bit. This process gives the completed piece a somewhat 3D effect. You don’t need to round off the edges of the antlers because they may be a bit delicate, but you may round them off if you wish. If you do not have a Dremel tool, you can just as easily use a small carving knife or even an X-acto knife.
Step 5: Woodburning the detail. Begin burning the hairlines. I recommend that you use a burner with a wedge tip, as it is the most versatile, and you can make the fine hairlines and do the shading by varying your angle of use. It also saves taking extra time to let the burner cool down to change to other tips. When burning the hairlines, go easy and relax. Look at a picture of a deer from a magazine or calendar and visualize the way hair lies and flows over the body. The muzzle and neck-patch under the chin as well as the insides of the ears and around the eyes are a slightly lighter shade, so do not press hard or go too slowly or the burning will turn out too dark. For the nose, eyes and antlers only shading is necessary. Continue the lines around the edge of the body to give the desired 3D effect. (For more tips on woodburning, see the TIP box.)
Step 6: Applying the finish. When you spray the lacquer finish, use moderately smooth, even passes and maintain about a 1-foot distance from the project. You may have to vary the passes and the distance to get the inside edges of your scrolled portrait. I recommend a satin finish because I feel it looks more natural, but choose the finish you prefer. Remember to spray light coats and let the piece dry between coats. Heavy coats tend to sag and run. If you do spray too much on one coat, use fine steel wool to remove any excess lacquer.
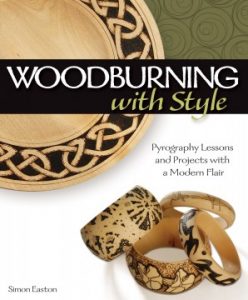
Step 7: Mounting your work. For the backing, use a dark felt or similar material or try something new. Get a photograph of trees, woodland or a mountain backdrop from an old magazine or calendar. You could even print out a photo from your computer and glue it to the back using a simple glue stick or Elmer’s glue. A unique backdrop enhances your completed piece of art. Attach a piece of cardboard to make the back more rigid.
Step 8: Framing. Framing your work is a simple process using a 1/4″ weathered wood. I cut 1″ strips from an old weathered 2 x 4 found outside. Simply nail the strips together with small brads at the edge of the board. This homemade frame further promotes the rustic outdoor appearance and helps your eyes focus on the main body of your work.
Add a simple hanger and you have a unique and beautiful piece of art. It will be unique because each one you complete may be similar in dimensions and pattern, but each line and shade will be different.
Attachments: