Realistic bird carvings are the envy of many woodcarvers. The best in the business command top dollar for commissions, win piles of awards, and quickly gain respect from their peers.
To keep a competitive edge at the next competition or to satisfy your own desire for the best results, you need to have a working knowledge of woodburning equipment and techniques. Woodburning is a critical element in making realistic feathers.
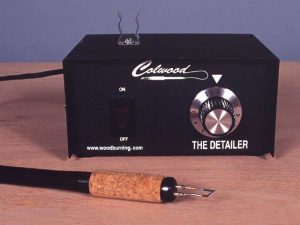
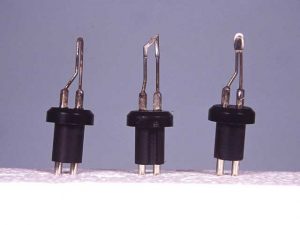
The woodburning system that most of the experienced carvers use is fairly simple. It consists of a lightweight AC-powered control box with an on/off switch and a temperature control dial. A plastic handpiece typically called a pen is attached to the box by an electrical cord. Interchangeable tips that perform the burning are fitted onto the pen.

One manufacturer of woodburning systems offers 30 different tips to deal with a range of textures from the intricate details of small fluffy feathers to scales on fish carvings. For most of my wildfowl projects, I get by with as few as three.
Wood-handle burning pens with a single heat setting are available, but these simple units are intended for pyrography projects where burn lines and shading are prominent. In most cases, the point tends to be too large for even the macro details on a bird. If you haven’t already done so, invest in a system that offers a range of heat settings and a handpiece that allows for tip replacement. A good tabletop model runs in the neighborhood of $100, while an economical system comes in at a little over $70. Digital models with LED displays are available, but expect to pay much more.
A Toaster in Disguise?
The workhorse of the burning system is, of course, the tip. Technically speaking, it is closely related to a toaster. Whether you are putting a burn on your bread or on a piece of wood, nichrome wire is at the heart of it. The heating elements in the toaster and the wire tip of the pen consist of an alloy of nickel and chromium. The material has two features that make it a good producer of heat:
Nichrome wire has a high electrical resistance compared to a material like copper wire, so even a short length of it has enough resistance to get very hot.
Nichrome does not oxidize when heated. Iron wire, by comparison, will rust very quickly at the high temperatures in the toaster or in the tip of the burning pen.
One manufacturer claims that its high-end systems can heat from a cool tip to 2000 degrees in seven seconds, providing almost instantaneous use of the handpiece. Are such high temperatures essential to realistic bird carving?
Answers to Some Heated Questions
A question I am often asked by beginners is how much heat is needed to burn in textures or even undercut feathers. Whenever possible, burn at the lowest temperature the control box puts out. The lines produced will be subtle and show little burn. I do know carvers who set the control at extremely hot temperatures that result in very visible lines. High heat, unfortunately, produces charcoal and ash on the surface. In order for the paints to adhere smoothly and be true to color, the burned wood must be cleaned off, usually with a bristle brush.
There are exceptions. One well-known bird carver burns for color. Using a high temperature, he creates color patterns and variations that show through the paint. In effect, he is employing pryrography to enhance the bird.
Unfortunately, when learning which temperatures are best to work with, you may not be able to rely on the control dial. The numbers are simply references, not abbreviated temperatures, and typically range from zero to ten. Purchase a dozen units of the same model and each will vary in temperature at the same dial setting. Only trial-and-error as well as practice will provide the answers. Have some scrap wood on hand to discover just how much burn the system is giving you.
Another question posed by beginners is how deep should the burn lines be. I begin my answer by pointing out that you can make your burns not only too deep but also too shallow. A fairly deep burn, while it may not be charred and black, is a crevice that has to be filled. Extra paint such as gesso is needed, but that can take away from the crisp-ness of the line. A burn line that is too shallow is quickly filled with paint, and again a potentially crisp line is lost.
The Smooth Approach
Basic to burning is having a smooth surface. Unfortunately, flaws that include bur and bit marks and sandpaper scratches won’t be disguised with paints. Even heavy applications of thick gesso will not cover defects. Before burning, but after sanding with a paper in the range of 220 to 400 grit, rotate the wood under an indirect light source such as a single bulb to find scratches and unwanted hollows. In most cases, you can eliminate them with a tip set at low heat. Holding the tip with a wide edge as flat as possible to the wood, lightly go over the surface and literally heat-seal it. Wood sculptors and cabinetmakers call this burnishing. Another approach consists of positioning the tip so that it is as perpendicular as possible to the wood and scraping until the surface is smooth.
A Skewed Approach
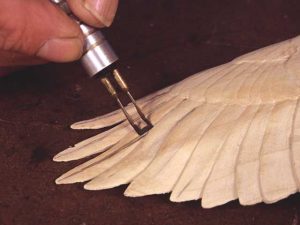
The essence of a feather consists of a central shaft and radiating, hair-like structures called barbs. For both of these features, hold the pen perpendicular to the surface of the wood. If you are right-handed, burn from left to right so that your view of where the tip has been is not obscured; but holding your head to the right may be necessary to get the best view. I have met some carvers who bend the tip to one side so that the handle can be tilted slightly while the tip remains perpendicular to the surface of the wood.
Needlenose pliers are a good tool for re-shaping the nichrome, but the wire must be brought to maximum temperature first. Failure to do so may snap the tip or put a curve in it that will render it ineffective. Make sure that your fingers are well removed from the hot tip.
The “Hard” Approach
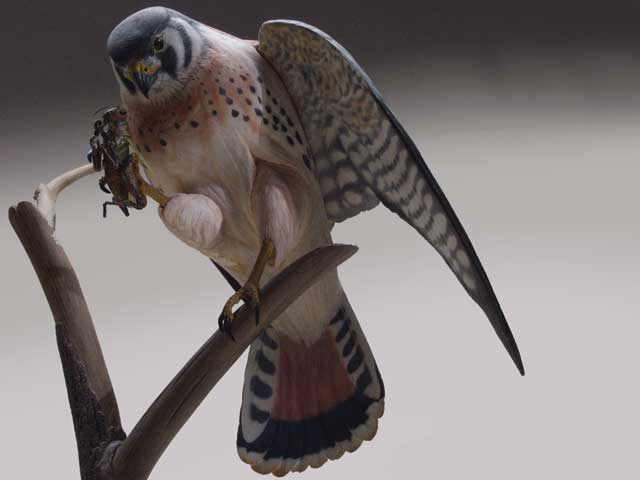
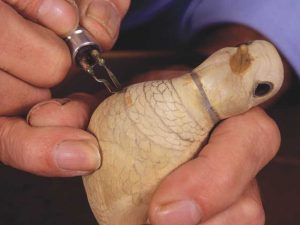
Feathers can be described as hard or soft. The hard feathers consist of the major flight feathers. The description comes from edges that have a smooth, hard look. Soft feathers, found on the belly, flank, sides, head and some-times the breast, have a variety of shapes, but their appearance is not rigid at all. Instead, they will appear fluffy in many cases.
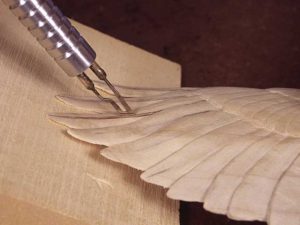
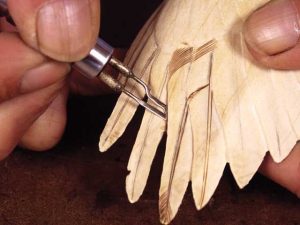
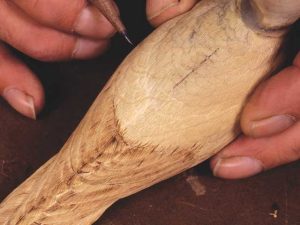
When burning an open wing that consists of hard primary and secondary feathers, start with the shaft first. Since a shaft is not always centered, sketch it in with a pencil before you start to burn. Begin by burning two parallel lines that merge at the feather’s tip. If the feathers on your project are splayed, use a backup block to prevent breaking the tips.
On large feathers, the shaft is noticeably raised. To remove wood from both sides of the shaft, you can go back with a rotary stone or diamond bit to remove wood. In most cases, the burning pen will be just as effective. Using a low-heat setting, a wide tip and heavy pressure, hold the pen so that it is almost horizontal to the surface. The result is compressed wood and a surface that needs little if any further sanding.
Burning Barbs
Beginners who are not familiar enough with feather anatomy sometimes burn the barbs nearly perpendicular to the shaft. In nature, the angle is only 30 to 45 degrees, except at the feather’s tip where the angle decreases to almost zero.
Another phenomenon of real feathers is that the barbs radiate from the shaft in flattened S shapes. Putting a slight twist in each barb actually contributes to the look of the natural convex shape of the feather. To keep yourself focused on the S curves, draw a few barb lines on each feather as a reference before burning.
The “Soft” Approach
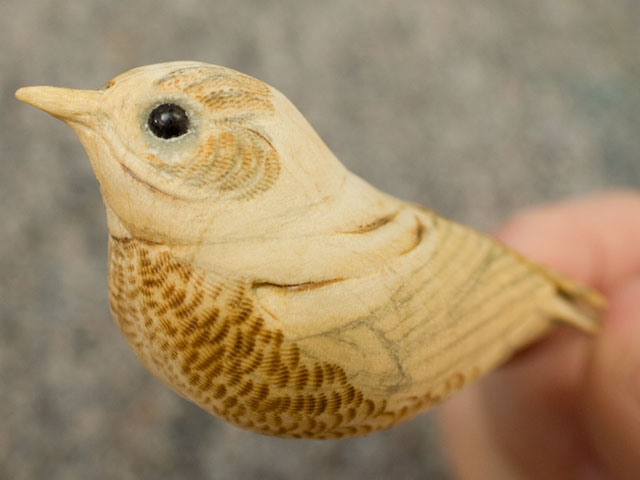
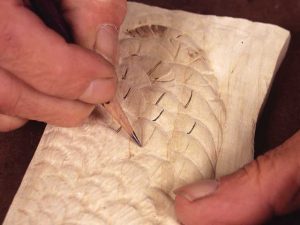
While the hard feathers are well defined, the soft feathers are not. In fact, most experienced carvers do not even carve the shape of the soft feathers of the head and breast on a bird such as a sparrow. Instead, they pencil in the feather shapes and burn using a touch-pull technique. Touch the tip to the origin of a barb and lighten up the pressure as you pull it through the wood.
Soft feathers on the real bird typically overlap like shingles on a roof, a design that helps it shed water. When burning the soft feathers on your project, start at the rear and work toward the head. Shafts will be visible on some soft feathers, so draw and burn them before the barbs. Do them lightly, making sure that they are not overly accentuated.
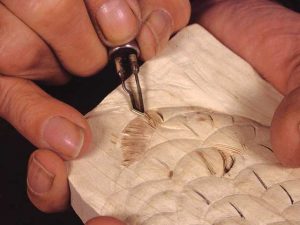
To provide a fluffy appearance to soft feathers, fan the barbs out so they do not look like regimented lines as on a hard feather. Also give S shapes to soft feather barbs and vary their directions slightly.
Split Decisions
Splits in the barbs are caused by preening, molting, or when a feather touches an uneven surface—an adjoining feather, for example—and it gets “torn” apart. In effect, the barbs unhook and separate. I often engineer a split to disguise a mistake in a sequence of burn lines or to compensate for a chipped edge.
Most splits can be accomplished with the burning pen. Burn the shafts and barbs first and then decide on where to create splits. I also recommend using splits judiciously. Too many splits are unrealistic or suggestive of an unhealthy wildfowl.
If you have kept the edge of the tip as sharp as possible, it is an excellent tool for making a split. Using it much as you would a detail knife, cut into the wood as if you were carving a wedge and lift the chip out. If the split is formed on your project so that a feather is revealed beneath it, consider the directions of the burn lines. They ought to be oriented in a different direction from those of the feather above.
Special Effects
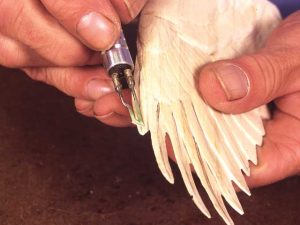
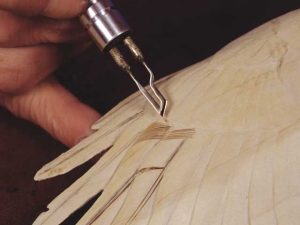
Since wing feathers separate when a bird is in flight, the look is enhanced with undercutting. As you did with splits, use the burning pen and tip as if it were a knife. Set the dial to a medium heat setting since you don’t want to char the wood and separate a feather from the one below it. While it is tempting to score a deep line with a single stroke, I suggest making the separation in stages. There is less chance of scorching the wood or having the tip slip and make an unwanted line.
Burning also enhances the look of stripes and distinct color boundaries. While it is not necessary to burn dark for a black stripe, the feathers in that area are laid out so that the barbs define the edges. With careful burning, a natural boundary is created that makes it easy for the application of paints that follow.
Burn…Within Limits
Hard and most soft feathers are fair game for the burning system, but not every shaft and barb line should be burned. The intermediary feathers found on the scapulars, back and sometimes the breast fall somewhere between the hard and soft feathers described above. While they may appear soft, they have definite edges. Experienced carvers shut off the burning system and turn to the rotary stone to texture these areas. When texturing with a stone, they grind in only some of the barbs, making sure that the lines are not as close together as burn lines.
Maintenance Tips
A woodburning system can burn out like any other electrical appliance. Should that happen, replace the unit or send it back to the manufacturer if it is still under warranty. I do not advise dismantling the control box to make your own repairs or adjustments.
If treated and stored properly, the pen should remain problem free, but the tips do need care. Here are some helpful suggestions:
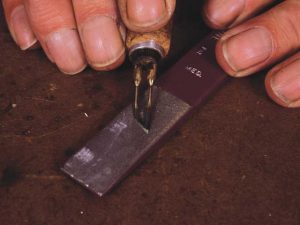
Before putting a new tip to work, heat it until it is glowing red for ten seconds and let it cool down. This is known as annealing the metal, and failure to do this results in a tip that does not hold its sharp edge for very long.
Even after the annealing process, a tip will dull after considerable use. A smooth edge at the end of the tip offers less drag or resistance when burning, so it is wise to keep it sharp. A medium-grit diamond stone sharpens quickly and efficiently. Put the stone on a stationary surface and stroke the tip as you would a knife blade. If you want to have a secondary bevel on the edge, simply hold the tip a few degrees above the horizontal.
Once sharpened, the edge still needs to be honed. Use a leather strop or a felt disc impregnated with some jeweler’s rouge in a rotary power tool set at a moderate speed.
Carbon deposits invariably build up on a tip and reduce the temperature of the tip. Do not turn up the heat setting to clean the tip. Instead, with the system turned off or unplugged, use very fine sandpaper such as 600 grit or a fine diamond hone.